Search

Hugin: create amazing panoramas from your photos

July 15th, 2007 edited by Tincho

Having been to DebConf7, I took advantage to visit a few beautiful places around the venue. Some of them are very hard to photograph with a common camera, specially when you’re trying to capture the full landscape from a hill or the complete sensation from a room in a castle —with all the walls covered with paintings and complicated ornaments—. So you have to resort to taking many pictures, but that’s not like the real thing.

Coincidentally, some time ago I’ve been researching some image processing topics, and found some amazing algorithms for automatic blending of multiple pictures to create mosaics of them. But I’d yet to see some ready to use implementation. Then, somebody from the table at the hacklab in DebConf7 enlightened me: hugin was the solution!

I have to admit it: the first attempts were really frustrating. A good time lost trying to adjust the images and the result was a nonsensical patchwork of images. So, take this in mind, and do what I didn’t: read the fine manual (and the tutorials). The manual is not very useful, but there are plenty of tutorials in the website.

So, the process is more or less like this: load the images, indicate where they overlap (setting control points), optimise, preview, adjust the control points, repeat until done. Setting the control points is what will determine how the images blend; but the most critical task is remember to run the optimiser before previewing or you won’t see your changes correctly! Here you can find a small tutorial that summarises the basic operation.

File list Control point setting Preview
File list and basic controls Setting the control points Preview of the final image

There are some optional tools that you’d like to have installed along with hugin:

autopano-sift
A tool that automates the most tedious part of creating a panorama: setting the control points. Note: you will have to change the default executable name in the hugin preferences to “autopanog”, as the default is wrong. Sometimes it works perfectly, sometimes it need to be helped by manually adding control points or horizontal/vertical lines, some other times is of no use at all. Your mileage may vary.
binfmt-support
Since autopano-sift runs in the mono environment, you would need this to execute it as a normal binary.
enblend
Replacement for the tool provided with hugin for blending images, with much better results.

A big problem I had was that hugin asked me some “crop factor” which is proportional to the size of the camera sensor, but nowhere is documented what that means. So, if you bump into this, you need to get the diagonal size of the camera CCD in mm and calculate 43.3 / diagonal. To get information about that, in this page you have a nice explanation about CCD’s sensors sizes. In the same site, you will find information for most digital cameras. If you don’t put correctly this value, most probably you won’t get any good result.

I’ll recommend you to also read this article, which explains how to use autopano-sift and the replacement blending tool, and gives some very good tips. Experiment and you will be amazed of the results!

To put an end to all this chatter, here is an example of a 360° panorama I’ve created from 23 pictures taken from the top of the Arthur’s Seat hill in Edinburgh. The control points were created with autopano-sift, and later added manually some horizontal lines to put the horizon into place, and some vertical lines in the monolith. The final blending was done with enblend, and the finishing touch is to crop it and convert to JPEG with gimp and copy the EXIF headers with jhead.
Arthur's Seat Hill panorama

Hugin is available in Debian since Etch, and in Ubuntu since Edgy

Posted in Debian, Ubuntu | 18 Comments »
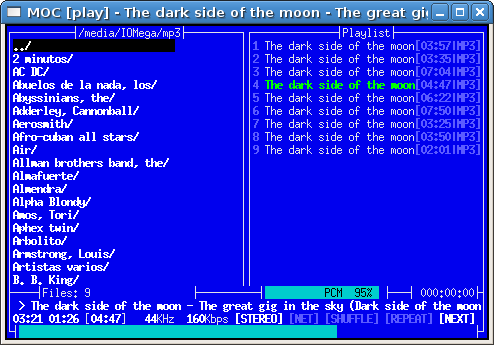
MOC: Music On Console, ncurses based console audio player

July 11th, 2007 edited by Tincho

Article submitted by Matías Teplitzky. We are running out of articles! Please help DPOTD and submit good articles about software you like!

MOC stands for Music On Console.

MOC is a powerful and easy to use console audio player. It does support OGG Vorbis, FLAC, WAV, WMA and MP3, among other audio formats. In addition, both playlists and URLs are supported. Moreover, JACK, OSS and ALSA output types are supported.

Screenshot

Its interface is based on ncurses, which consist in two columns (it will probably remind you “Midnight Commander”, mc package in Debian). The first column allows you to browse the filesystem so you can search and find the files you want to play. The second column can be used not only to create your custom playlist, you can also indicate MOC a certain directory where your audio files are, and they will be automatically reproduced.

To see MOC in action, just type mocp on a console. In this way, the server and the client (the interface, actually) will be started automatically for you. It takes some time to get used to the interface, but once you get comfortable with it, you will find it easy and quick to manage. Some tips to start: with the TAB key, you can switch between the playlist and the load list; by pressing a, you will add a file to the playlist; the ENTER key is used to start playing a file or browse the filesystem; with < and > you can increase and decrease the volume. In addition, note that by just pressing q, the client will quit, but the server will still be running. To kill both the server and the client, press Q instead. Complete help can be found by pressing h or at the man page of the program (type man moc).

One thing to remark about MOC is the fact that it is very low resource consumin, so it will run smoothly, even on old hardware. Take advantage of it!.

Want to have some extra fun? Just try some of the themes available for MOC (yes, themes are supported!).

MOC has been available in Debian and Ubuntu since a long time ago. It is licensed under the GPL and you can find its homepage at http://moc.daper.net.

Posted in Debian, Ubuntu | 16 Comments »

QEMU: easy and fast processor emulator

July 8th, 2007 edited by ana

Article submitted by Michael Williamson. We are running out of articles! Please help DPOTD and submit good articles about software you like!

QEMU lets you emulate a machine —in other words, you can run a virtual computer on top of your real computer. This makes it perfect for trying and testing the latest release of a distribution, running older operating systems, or just testing.

So, let’s say you wanted to run a LiveCD, which you have stored on your hard drive. Easy enough! We just type:

qemu -cdrom path/to/livecd.iso -boot d

The -cdrom option tells QEMU the path to the CD you want to use, while -boot dictates what device we’re booting from —in this case, we want to boot from the CD, which is always device d.

You might get a message about kqemu —you can safely ignore this for now.

Alternatively, you may want to boot from a real CD in your computer —so, you simply use the path to your CD drive in /dev. For instance, if your CD drive is /dev/hdc, then we would use:

qemu -cdrom /dev/hdc -boot d

Of course, we don’t just want to use CDs all the time —we might want to actually install something! So, we’ve got to make a hard drive image first. This is achieved by using qemu-img, like so:

qemu-img create virtualharddrive.qcow 5G -f qcow

This creates an image called virtualharddrive.qcow, which is 5 gigabytes big. If you wanted it to be 5 megabytes, you could type 5M instead, for ten gigabytes, type 10G, and so on.
Finally, the -f option tells qemu-img what format you want to use. While there are a few to choose from, qcow is the norm - it works well enough, and only takes up the space on the hard drive that it needs. If the virtual hard drive had a capacity of 5 gigabytes, but only contained 2 gigabytes of data, then it would only take up about 2 gigabytes on your real hard disk.

So, now we want to get installing. Simply type:

qemu virtualharddrive.qcow -cdrom path/to/installcd.iso -boot d

Then, you can simply follow the instructions just as with an ordinary installation.

Now, not all distributions come on one CD —in some cases, you’ll need to swap CDs. To achieve this, we need to do two things. First of all, we make the QEMU monitor appear on the command line by adding the option -monitor stdio, so we end up with something like:

qemu virtualharddrive.qcow -cdrom path/to/installcd.iso -boot d -monitor stdio

When you run this command, QEMU should let you enter commands. To change CDs, simply type in the commands:

eject cdrom

change cdrom path/to/newcd.iso

Voila! The virtual machine should now have changed CDs so you can continue the installation. Naturally, you can change CDs at any time, not just during installation.

Once the installation has finished, you’ll want to boot from the hard drive. Since QEMU does this by default, simply remove the -boot d part of the command:

qemu virtualharddrive.qcow -cdrom path/to/installcd.iso -monitor stdio

If you have no intention of using the CD after the installation, then you can cut that out as well:

qemu virtualharddrive.qcow -monitor stdio

This should let you play around with your newly installed system at your heart’s content without endangering your own PC. If you want to fiddle with something, but don’t want the changes written to the image, then add the option -snapshot. If, after using this option, you decide that you actually want to save the changes made to the hard drive, then simply type commit into the QEMU monitor, and the changes will be written.

While these commands work, unless you’re using lightweight distributions, you might find things going a little slowly. This is due to QEMU, by default, only taking up 128MB of RAM. You can increase the amount available by using the -m option, followed by the amount of RAM in megabytes. For instance, if I wanted to allocate 256MB to QEMU for running a LiveCD, then I would type:

qemu -cdrom path/to/livecd.iso -boot d -m 256

That should speed things up nicely! But don’t give QEMU too much memory —you want some left for your other applications. Unfortunately, things are probably still fairly slow— to speed things up even more, you’ll probably want to use kqemu, otherwise known as the QEMU accelerator.

Installing kqemu from the repositories is reasonably straightforward. First of, grab the kqemu-source package —if you apt-get is your package manager of choice, then the command used is:

apt-get install kqemu-source

If you don’t have module assistant already, you’ll need that installed as well:

apt-get install module-assistant

Then, type in the following commands (as root):

m-a prepare

m-a auto-install kqemu

That should be it! Now, every time you want to use the kqemu module, you first need to become root, and then type:

modprobe kqemu major=0

Then, as an ordinary user, QEMU will automatically use kqemu, which should help speed things up. If QEMU complains that it still cannot use kqemu, then you might not have the necessary permissions —try typing the following as root:

chmod 666 /dev/kqemu

Hopefully, kqemu should now be usable by QEMU.

There is one final option: -kernel-kqemu. This, in theory, speeds up the emulation even further. Unfortunately, it isn’t as simple as that. Firstly, the version of QEMU in the Debian repositories cannot use -kernel-kqemu. Secondly, even if it could, not all guest operating systems would work with this enabled —for instance, a recent distribution of GNU/Linux would probably work faster with this option (if it worked!), but Windows 98 just crashes.

QEMU is available from Debian Sarge and Ubuntu Warty.

Posted in Debian, Ubuntu | 9 Comments »

gnu units: units converts quantities between different scales

July 4th, 2007 edited by lucas

Article submitted by Geoffroy Youri Berret. We are running out of articles ! Please help DPOTD and submit good articles about software you like !

units is a command-line tool which performs units conversion between various scales. units is the perfect tool for engineer or scientific workstation, you can call it either interactively from the prompt or within command line. It already handles more than two thousand units and this can be enhanced with your own units in a separate data file.

units handles multiplicative scales factor as well as non-linear conversions units such as Celsius Fahrenheit. Compound units are also allowed in order to deal with quantities such as speed, volume, energy, etc.

Interactive use

Calling units without any option will run it interactively. Here is an example showing how to convert cm3 to gallons:

%units
2438 units, 71 prefixes, 32 nonlinear units

You have: cm^3
You want: gallons
        * 0.00026417205
        / 3785.4118

units returns two conversion rates. The first one is the convertion factor you asked for, the second is its inverse or the conversion in the oposite direction. Sometimes the inverse factor could be more convenient because it would be the exact value.

units also provides the definition of units of you leave ‘You want:’ field empty:

You have: ohm
You want:
        Definition: V/A = 1 kg m^2 / A^2 s^3

Or you may want to compute sums of conformable units:

You have: 2 hours + 46 minutes + 40 seconds
You want: seconds
        * 10000
        / 0.0001
You have:  20 inches + 15 cm - 1 foot
You want: cm
        * 35.32
        / 0.028312571

And finally, not a minor feature when you have to deal with so many units, the completion with the tab key. It will complete unitname if there is a unique way to do so or provide a list of possibility with the second hit of the tab key :

     You have: metr
     metre             metriccup         metrichorsepower  metrictenth
     metretes          metricfifth       metricounce       metricton
     metriccarat       metricgrain       metricquart       metricyarncount
     You have: metr

units non-interactively

units [options] [from-unit [to-unit]]

Invoking units with options will turn off the interactive mode and return conversion to stdout :

%units '2 liters' 'pints'
        * 4.2267528
        / 0.23658824

Availability

gnu units has been available in Debian since Sarge and in Ubuntu since Warty.

Links

Posted in Debian, Ubuntu | 7 Comments »

Frets on Fire: Play the guitar with your keyboard, Rock ‘em!

July 1st, 2007 edited by ana

Article submitted by Miriam Ruiz. We are running out of articles ! Please help DPOTD and submit good articles about software you like !

Did you ever wanted to emulate your favorite guitar idol? With Frets on Fire you can try it from your very own keyboard. All you have to do is to pick it up as if it was a guitar, with one hand pressing the fret buttons (F1 to F5) and another pressing the pick button (Enter). Frets on Fire, or FoF for short, a clone of the Guitar Hero video games. As joysticks are also supported, you can even use the Guitar Hero controller with a PS2/USB adapter instead of the keyboard to increase the feeling of being a rock star. Frets on Fire was the winner of the Assembly demo party 2006 game development competition.

The keys keep appearing in the screen as the song is being played. All you have to do is to press in the correct keys (frets), and then mark them with Enter (pick button) in the very exact moment. It seems easy, doesn’t it? If you keep plucking the notes properly the coefficient by which your points are multiplied keeps increasing (x2, x3, even x4), but just a single note badly played and it will fall back to x1 again. Since version 1.2.438, the game features “hammer-on and pull-off” (commonly abbreviated to “HOPO”) notes. A HOPO note allows you to only press its fret button to play it if the previous note was played correctly. There purpose of the game is just to play the virtual guitar the best you can, and to obtain the highest score you’re up to. It’s even possible to compare your results with other players on the official web page of the game. There are 4 levels of difficulty in the game: Supaeasy, Easy, Medium, and Amazing. Suit yourself.

Written in Python, and released under the GNU General Public License, the game also includes a tutorial and a built-in song editor. The game has become quite popular in the last year, and songs can be found just everywhere in the Internet, with many devoted fan web pages all around.

The original tarball of the game included some non-DFSG-free song files and some internal fonts which needed to be replaced in order for the game to enter Debian repositories, but a new pack of new songs made by Carlos Viola Iborra, and released under a free license, has been added to the repositories (Thanks, Carlos! ). The original songs that came along with the game, which were made Tommi Inkilä, will probably be included in the non-free repositories soon, too.

Screenshots and Video

Screenshots of the main menu and a game: (click to enlarge)

There is a video in YouTube with a player playing the famous “Smoke On The Water” of Deep Purple.

Posted in Debian, Ubuntu | 8 Comments »

« Previous Entries Next Entries »