Search

Bootchart: boot profiling

February 24th, 2008 edited by Tincho

If you usually read Debaday, you must have noticed the recent lack of articles. We apologise for that, we’re lacking articles and editing manpower. We really need your help to keep the site running!

Article submitted by Stevem. Guess what? We still need you to submit good articles about software you like!

On a recent vacation my laptop boot time (>4 min.) started getting on my nerves. I resolved to enjoy the vacation but fix things on my return. At home a few minutes with Google brought bootchart to my attention.

Boothchart won’t cure lengthy boot times but it will provide details about how the time is spent. Bootchart is actually two packages, bootchart, the profiler daemon to gather resource data from /proc during boot, and bootchart-view to create an image from the collected data.

bootchartd starts measuring as soon as /proc is mounted. From /proc it collects a sizeable amount of data about processes, including (in 2.6 kernels) disk utilization and throughput.

The documentation suggests to use BSD process accounting to exactly reconstruct the process tree. The CONFIG_BSD_PROCESS_ACCT_V3 feature is enabled in stock Debian kernels, so to use this, you just need to install the acct package.

I expected profiling the system boot would be complicated and I was prepared for some serious hacking to measure the process. In fact, it couldn’t be much easier.

The boot profiler is started as an option to the boot/loader kernel command line.

It works with LILO but Grub’s interactive boot makes it very simple:

  1. Select your image entry from the boot menu
  2. Type ‘e‘ to edit the entry
  3. Append ‘init=/sbin/bootchartd‘ to the command line
  4. Type ‘b‘ and you’ll be booting with bootchart profiling in effect

bootchartd starts itself and then launches /sbin/init. There’s no indication that logging is in effect, console output appears as usual. Once you login you’ll find all the boot data stored in a compressed tar, /var/log/bootchartd.tgz.

To view the data run bootchart-view. It defaults to creating a SVG image but EPS and PNG outputs are possible with the --format option.

Here’s an example of the output:

bootchart-intro.png

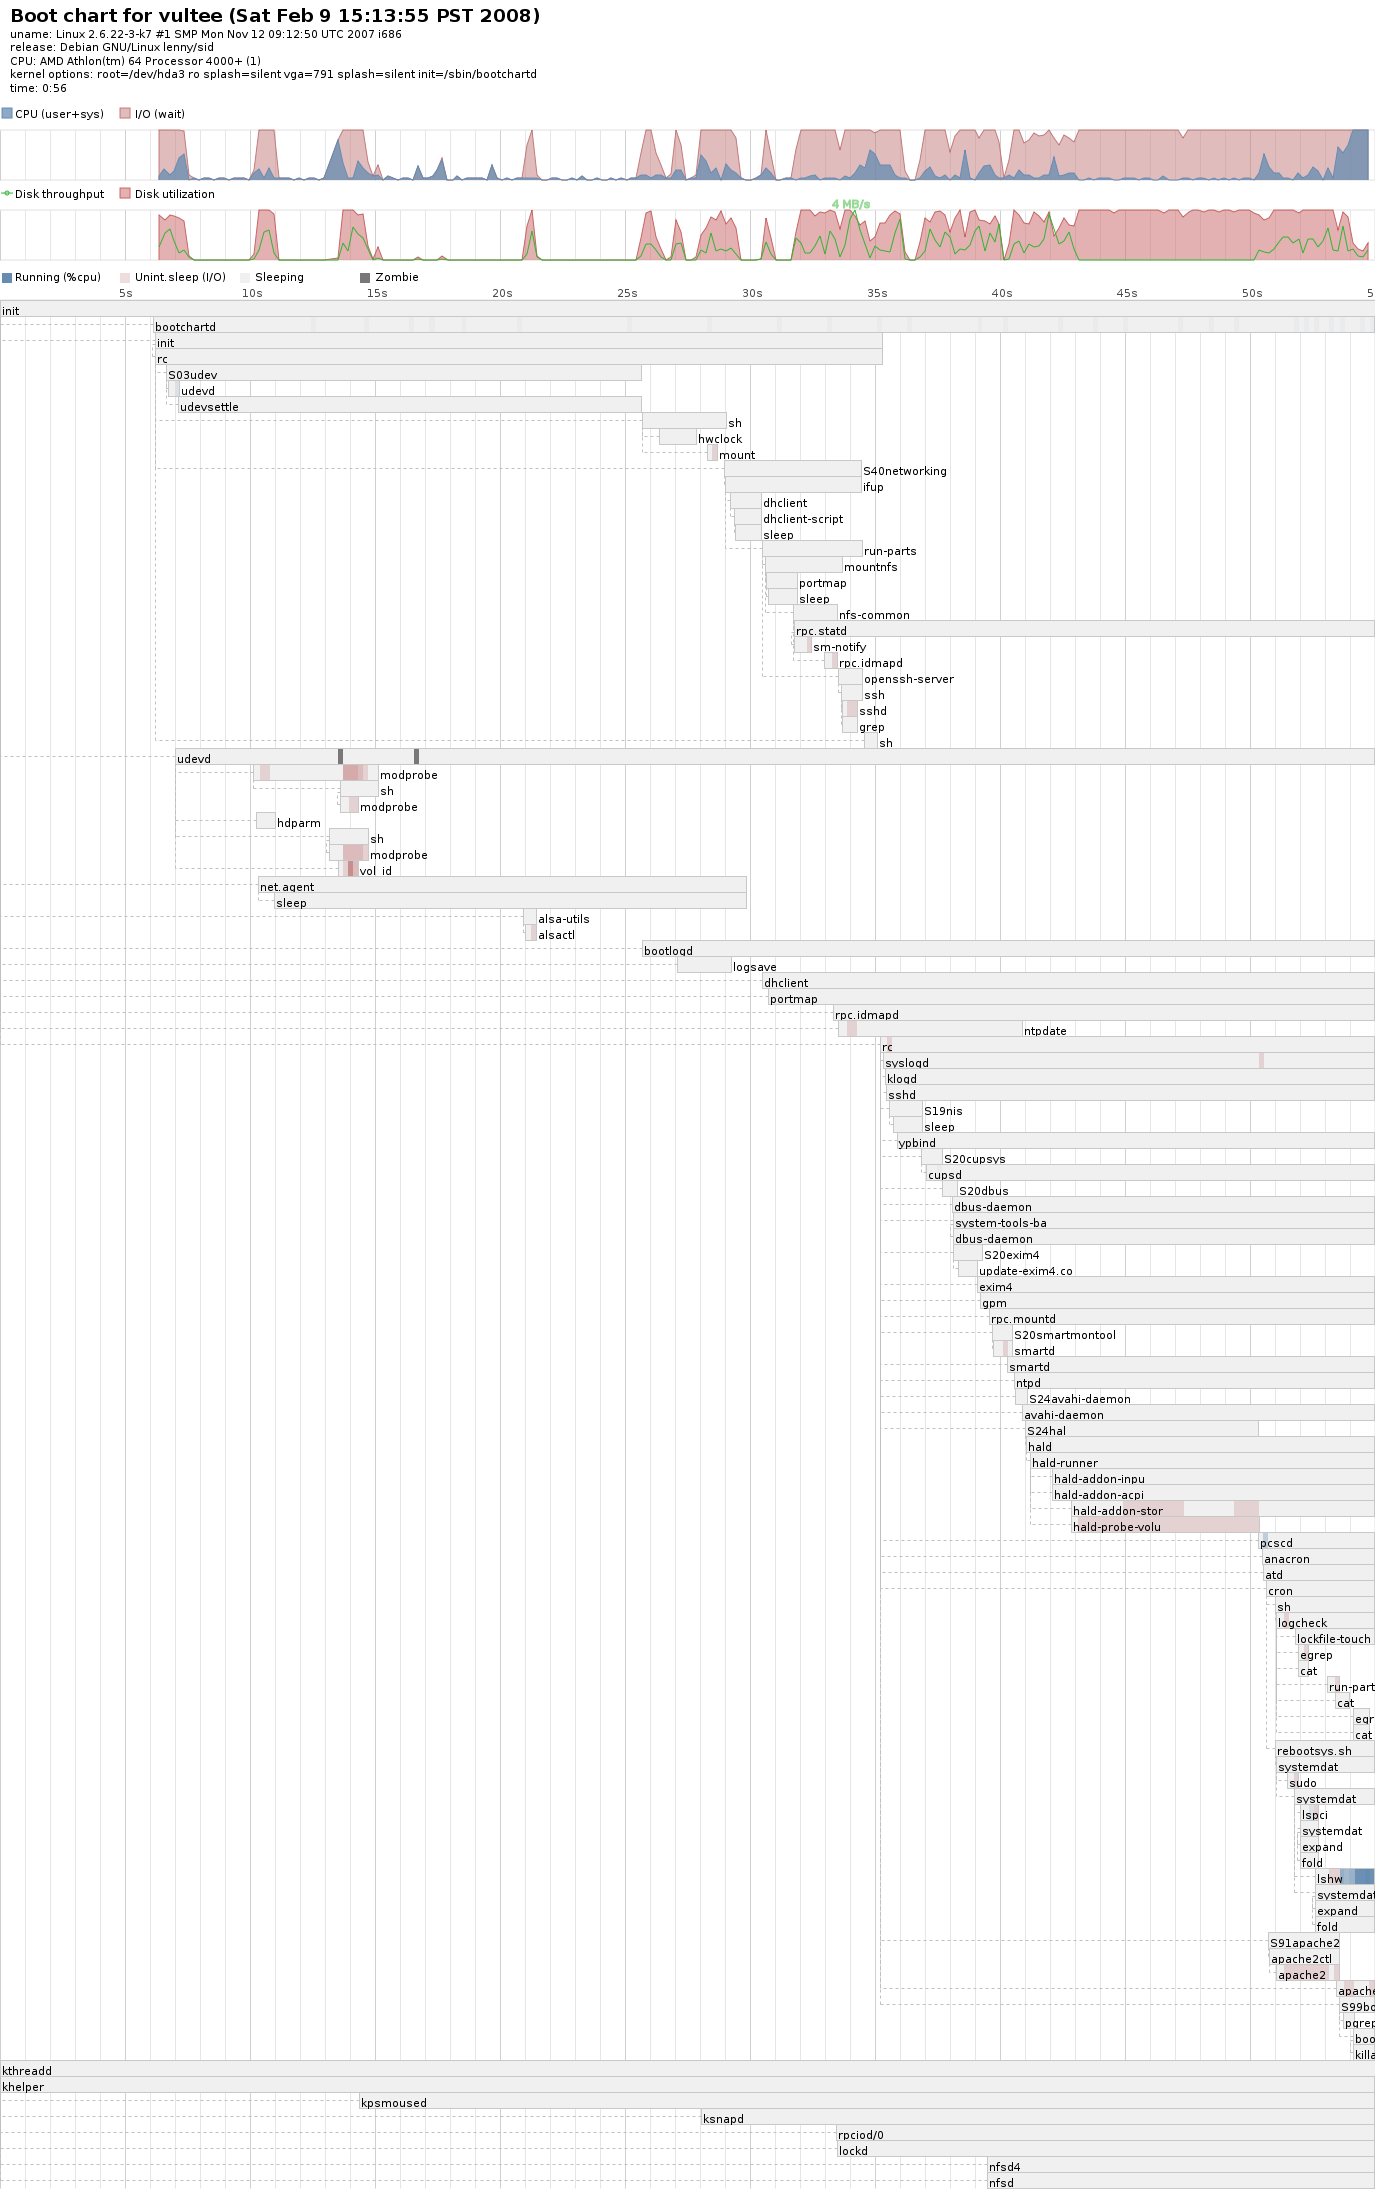
By default the chart renderer doesn’t display most child processes. If you think that level of detail will be helpful, bootchart-view has a --no-prune option. Be warned, it will create a fairly large image.

Conclusion: I still haven’t significantly decreased my boot time, many before me have tried and failed, but I discovered a clever, easy-to-use profiling tool to diagnose boot problems.

The bootchart-view package has been available .

The bootchart package has been available .

Posted in Debian, Ubuntu | 4 Comments »

rkhunter & chkrootkit: wise crackers only

February 6th, 2008 edited by Tincho

Article submitted by Claudio Criscione. Guess what? We still need you to submit good articles about software you like!

Rkhunter and chkrootkit are tools to check for signs of a rootkit. They will inspect the system they’re running on and report anomalies either through the shell or via email.

Although an attacker able to install a rootkit is likely also able to easily escape or delete these tools, not every attacker is a skilful one. Not every script kiddie knows about these tools or the way to cover its tracks. Since every single error can make the difference, on either sides, an effortless passive protection can do no harm and adds one more (maybe thin) layer of security.

Both rkhunter and chkrootkit, indeed, can be deployed quickly and require little management effort.

Installation

Thanks to apt-get, aptitude and their super cow powers, we can just go for a

$ sudo aptitude install chkrootkit rkhunter

Or go root if you’re not a sudoer. Once installed, both packages will add a cron entry and automatically execute every day.

What they do

Both chkrootkit and rkhunter use a signature-rule/filter based system: they can detect the presence of known rootkits —via files or similar indicators— and flag anomalous conditions, like interfaces entering promiscuos mode or hidden files. In fact, not unlike anti-virus programs, rkhunter and chkrootkit indeed need periodical updates.

The signature based approach is a quite simple one, something like a big grep and strings combo: it is strongly suggested to have an alternate copy of some binary (egrep and strings, just to name a couple) so that —at the very least— the aggressor has to patch them too. Obviously, mounting the disk via another machine is far more reliable, even if it won’t allow you to find modified rootkits.

Both softwares provide MD5 signature verification on known binaries, with sort of a white list approach, thus trying to ensure that none of the most important binaries were tampered with. Among others, checks performed include searching for hidden directories and scanning for promiscuous interfaces and suspicious file permissions.

So, what are the differences?

Rkhunter pros

The autoupdate feature is a very nice feature to have. You just have to run rkhunter –update and the software will update the rootkit definitions. You can control the autoupdate behaviour via the /etc/default/rkhunter file, using the CRON_DB_UPDATE parameter, which is enabled by default. This will upgrade the system binaries MD5 database and the good/bad/black list of applications and program versions.

Other features of note include the ability to use WebJob to run rkhunter in a centralized manner, thus simplyfying administration, and the colorful interactive mode you can run with rkhunter -c.

rkhunter in interactive mode

Chkrootkit pros

Chkrootkit provides a differential mode where it reports only what changed between the latest scan and the previous one. While this is a very nice feature to limit the impact of false postives, one single missed mail can make the difference, so choosing whether it should be enabled or not is an important decision.

If the whole “grep and look for signatures” stuff is not enough for you, you can root chkrootkit in expert mode, with

# chkrootkit -x

This will give you a greatly improved control on what’s going on and more verbose output, but make sure to redirect the output somehow.

Chkrootkit has a nice modular design, with subcomponents taking care of differenct aspects, like lastlog and wtmp deletions. Last but not least, chkrootkit can run without installation and from a read only media.

The big decision

Maybe now you’re wondering “which one should I use?”. My answer is simply “both of them”. There is no reason not to do that, so go for it. Chkrootkit has been available since, at least, Sarge and Dapper. Rkhunter, being newer, has been available since Etch.

The chkrootkit package has been available .

The rkhunter package has been available .

Posted in Debian, Ubuntu | 13 Comments »