Search

Ghextris: tetris clone with a hexagonal makeover

June 8th, 2008 edited by Tincho

Article submitted by Alex Drachmann. Guess what? We still need you to submit good articles about software you like!

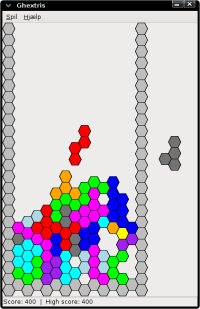
The object of the game is much the same as with tetris, only the frame and the falling objects are hexagons. You have to slot the coloured pieces together making rows, which disappear once they are complete, the game ends if the stack of pieces reaches the celling.

Ghextris

Hexagons are hard to stack, so the game is more challenging than other games of its type, but it gets easier with practice. The game play gets rapidly challenging, as you make mistakes or run out of room and to make it worse, the objects you get are often the most useless for the job, plus it seems as if they fall at an increasingly faster rate. A score is kept based on how many lines you complete. Your current score and the highest score can be viewed on the bottom of the window, so you can try to match or beat your best score or that of a friend.

The interface and graphics are simple and integrates nicely in with the gnome environment. The colouring of the pieces is plain, with no texture or shading, so it doesn’t distract away from the game play. The top bar has two entries: play and hepl. The play menu has three actions, «play» (keyboard shortcut: ctrl+n), «pause» (ctrl+p or just p) and «quit» (ctrl+q). The help menu only has the infamous «about» option, with details about the version and author available.

The keys for playing the game are the direction keys, left and right on the keyboard, which moves the pieces left or right. The up and down keys turn the pieces 90 degrees in one direction or the other. Pressing the space bar makes the current piece crash into the slot directly beneath it.

The version I played was version 0.9.0, which is the current version in the universe repositories of Ubuntu Hardy Heron 8.04 and in the Debian repositories. Ghextris is available in all current releases of Debian and Ubuntu.

The official site of the game is: http://mjr.iki.fi/software/ghextris.

The author of the game and lone developer of it is Mikko Rauhala, who admits to being inspired by a similar game called Xhextris by David Markley.

Posted in Debian, Ubuntu | 2 Comments »

JOE Joe’s own editor: a really usable text editor

June 2nd, 2008 edited by Adelie

Article submitted by Neil Stewart. Guess what? We still need you to submit good articles about software you like!

Back in the day, when I was new to Linux, joe was the first text editor that I managed to quit without having to reboot my machine. That I am still using it today, many years later, goes to show just how simple yet powerful joe is. If you don’t want to use emacs (because what’s the point of running two operating systems?) and still can’t work out how to use vi, then joe is for you.

joe is started from the command line with joe or joe filename to edit filename. When you start joe you get a single header bar with information about where the cursor is, what time it is and, crucially, the message «Crtl-K H for help» (^KH in joe shorthand). So if you press Ctrl and K together, release them, and then press and release H, the top half of the screen is given over to a brief list of commands. And it’s here I learnt how to quit (without rebooting), how to open a new file, how to save a file. And how to move the cursor around, how to find and replace, how to skip over words and lines, how to marks blocks of text and move them about. And you can carry on working on your file —you just type— with the help up. So within a really short amount of time you’ll be up to speed.

JOE

But joe is powerful too. For example, you can process any block of text through any shell command. joe’s help file gives a good example. If you mark the block of text by moving the cursor to the beginning and ^KB, then move to the end and ^KK, then pipe the block of text through sort with ^K/ sort. joe then runs the block of text through sort and replaces the block with the result. Powerful, especially in conjunction with old faithfuls like tr and sed.

Search and replace is also easy. ^KF and enter a search term. That’s it. But search and replace is powerful too. You can reuse old search terms by pressing the up cursor key, including terms from previous sessions. You can use tab completion to complete from any of the words in your current document after you’ve typed the first few letters. Then you can choose what to do when you find it. To replace press R and enter the replace term. You can replace one by one, or replace all. ^L finds the next entry. And you can use regular expressions —this is unix after all. Again the help file has a neat example. If you search for \*,\*,\*$ (\* matches zero or more characters and $ matches the end of a line) and replace with \2,\1,\0 (\X matches Xth pattern found) the string «one,two,three» becomes «three,two,one». Bring up help with ^KH and skip a few screens with ^[. a few times to remind yourself of the regular expressions.

Macros are easy too. Start recording one of ten macros with ^K[ and then a digit. Finish the macro with ^K]. Then use ^Kdigit to play the macro.

joe has many more features. joe remembers where it was in the file when you next edit it. joe colours your C, Java, LaTeX, HTML, and many other formats by default. joe indents your source code and justifies your text. joe supports multiple windows. joe can set bookmarks. You can compile your source code from within joe (^[C) and then skip to the errors the compiler identifies (^C= next error, ^C- previous error).

Finally, joe is old, stable, and just works. It’s in version 3.5 in etch and lenny. I use it for everything, all day every day, and it never fails. Find out much more with info joe or at the Sourceforge home page.

Posted in Debian, Ubuntu | 9 Comments »

mhddfs: join several real filesystems together to form a single larger one

May 25th, 2008 edited by Tincho

Article submitted by Roman Mamedov. Guess what? We still need you to submit good articles about software you like!

Suppose, you have three hard drives - sized 80, 40 and 60 GB. And 150 GB of music files, which you need to store on these drives. How would you do it?

The two solutions I knew of, were:

  • either to simply have three separate «Music» folders - one per each drive;
  • or create some sort of RAID, joining all the drives into an array.

However, the first method is quite tiresome, as one needs to decide how to split the data between the drives and keep track of what is stored where. For example, I might decide to store all «Classical» music on the first disk, and «Rock» music on the second. Then, suddenly, the first drive fills up and the second one still has plenty of space. Now I need to move the files between the disks, or jump around with symlinks.

The RAID method, while solving this problem, always incurs significant loss of either storage reliability or usable disk space.

But recently, I found a better solution to this problem and similar ones: mhddfs. It is a FUSE filesystem module which allows to combine several smaller filesystems into one big «virtual» one, which will contain all the files from all its members, and all their free space. Even better, unlike other similar modules (unionfs?), this one does not limit the ability to add new files on the combined filesystem and intelligently manages, where those files will be placed.

The package is called «mhddfs» and is currently present in Debian Testing and Unstable. It does not seem to be available in Ubuntu at the moment.

Let's say the three hard drives you have are mounted at /mnt/hdd1 /mnt/hdd2 and /mnt/hdd3. Then, you might have something akin to the following:

$ df -h
Filesystem            Size  Used Avail Use% Mounted on
...
/dev/sda1              80G   50G   30G  63% /mnt/hdd1
/dev/sdb1              40G   35G    5G  88% /mnt/hdd2
/dev/sdc1              60G   10G   50G  17% /mnt/hdd3

After you have installed the mhddfs package using your favourite package manager, you can create a new mount point, let's call it /mnt/virtual, which will join all these drives together for you. The beauty of FUSE means you don't really have to be root for this (can be just a member of the fuse group), but for the sake of examples' simplicity, let's suppose we are logged in as root here.

# mkdir /mnt/virtual
# mhddfs /mnt/hdd1,/mnt/hdd2,/mnt/hdd3 /mnt/virtual -o allow_other
option: allow_other (1)
mhddfs: directory '/mnt/hdd1' added to list
mhddfs: directory '/mnt/hdd2' added to list
mhddfs: directory '/mnt/hdd3' added to list
mhddfs: move size limit 4294967296 bytes
mhddfs: mount point '/mnt/virtual'

The «-o allow_other» option here means that the resulting filesystem should be visible to all users, not just to the one who created it.

The result will look like this:

$ df -h
Filesystem            Size  Used Avail Use% Mounted on
...
/dev/sda1              80G   50G   30G  63% /mnt/hdd1
/dev/sdb1              40G   35G    5G  88% /mnt/hdd2
/dev/sdc1              60G   10G   50G  17% /mnt/hdd3
mhddfs                180G   95G   85G  53% /mnt/virtual

As you can see, the new filesystem has been created. It joined the total size of all drives together (180G), added together the space used by all files there (95G) and summed up the free space (85G). If you look at files in /mnt/virtual, you'll notice that it has files from all three drives, with all three directory structures «overlayed» onto each other.

But what if you try to add new files somewhere inside that /mnt/virtual? Well, that is quite tricky issue, and I must say the author of mhddfs solved it very well. When you create a new file in the virtual filesystem, mhddfs will look at the free space, which remains on each of the drives. If the first drive has enough free space, the file will be created on that first drive. Otherwise, if that drive is low on space (has less than specified by «mlimit» option of mhddfs, which defaults to 4 GB), the second drive will be used instead. If that drive is low on space too, the third drive will be used. If each drive individually has less than mlimit free space, the drive with the most free space will be chosen for new files.

It's even more than that; if a certain drive runs out of free space in the middle of a write (suppose, you tried to create a very large file on it), the write process will not fail; mhddfs will simply transfer the already written data to another drive (which has more space available) and continue the write there. All this completely transparently for to the application which writes the file (it will not even know that anything happened).

Now you can simply work with files in /mnt/virtual, not caring about what is being read from which disk, etc. Also, the convenience of having large «contiguous» free space means you can simply drop any new files into that folder and (as long as there's space on at least one member of the virtual FS) not care about which file gets stored where.

If you decide to make that mount point creating automatically for you on each boot, you can add the following line to /etc/fstab:

mhddfs#/mnt/hdd1,/mnt/hdd2,/mnt/hdd3 /mnt/virtual fuse defaults,allow_other 0 0

For more details, see man mhddfs.

The last, but not the least important thing to mention, is the fact that it's very simple to stop using mhddfs, if you later decide to do so - and not lose any file data or directory structure. Let's say, at some point in time, you purchase a new 500 GB hard disk, and want to sell the smaller disks on Ebay. You can just plug in the new drive, copy everything from /mnt/virtual onto it, and then remove mhddfs mount point and disconnect old drives. All your folders, which were previously merged in a «virtual» way by mhddfs, will now be merged in reality, on the new disk. And thanks to the fact that files themselves are not split into bits which are stored on different drives, even in the unlikely event when mhddfs suddenly no longer works for you (or disappears from existence), you can still copy all your data from all three drives into one single folder, and have the same structure you previously had in that /mnt/virtual mount point.
Posted in Debian, Ubuntu | 30 Comments »

potrace: Transform bitmap images into vector graphics

May 19th, 2008 edited by Tincho

Article submitted by András Horváth. Guess what? We still need you to submit good articles about software you like!

You can face the task sometimes that you need a high resolution material from a particular image. Most probably when you’re a graphic designer (or even a tattoo artist), you might want to have a good quality result from a low resolution image that you can magnify no matter how much, it will give you smooth edges in high quality.

For this, you have the following possibility without a trace program: using a pixel graphic software like Gimp, you can resize the image with the best resampling method and apply a selective blur filter on it. Most of the times this doesn’t give the necessary quality.

There is a small but powerful utility called potrace developed by Peter Selinger, a mathematics professor at the Dalhousie University.

With a trace program like potrace, all you have to do is to give the image as an input, and there you have the result in the standard SVG format. potrace can produce even PDF format as an output.

Command-line example:

$ potrace -s image.bmp

With this process, the program transforms the images’ pixels into filled curves that have infinite resolution with smooth lines at any zoom.

In my personal experience while working as a graphic designer, potrace gave me very good results to many input images. Compared to other high expensive proprietary software, when the input image had sharp endings, potrace gave sharp edges in the result and other programs gave bad results, curving the edges. That needed a lot of manual correction.

Pros (compared to other programs):

  • Very good results
  • Pretty fast
  • Can be easily run from a command-line
  • Can be used from the Inkscape open-source vector graphics software (Path / Trace Bitmap menu or Shift+Alt+B)

Cons:

  • Only 2 colors output (Black & White), no colored process is available yet
  • potrace does not support PNG images as an input (though images can be converted easily from PNG with a whole variety of free programs)

This is an example found in the homepage, you can see the original bitmap and the vectorised image:

Original bitmap potrace output

The package has been available both in Debian and Ubuntu since a long time ago.

Related links:

http://en.wikipedia.org/wiki/Potrace

http://wiki.inkscape.org/wiki/index.php/Potrace

Posted in Debian, Ubuntu | 10 Comments »

kteatime - Small tray utility which reminds you of steeping tea

May 11th, 2008 edited by Patrick Murena

Article submitted by Stephan Windmüller. Guess what? We still need you to submit good articles about software you like!

For some people coffee seems to be the only liquid they drink in front of their workstation. But for those who enjoy a cup of tea once in a while, kteatime may be a neat little helper.

I expect every one of them knows this situation: The water just boiled, you put some green tea in your cup, add the water and return to your work. 15 minutes later you realize that you forgot your tea and only dozens of sugar cubes will rescue it. ;)

kteatime helps you to prevent this situation in form of a little timer in the tray.

kteatime configuration window

After selecting the appropriate kind of tea and starting the timer it will display a little circle which turns from red to green. The tooltip informs you how long your tea will need.

When your tea is ready, kteatime informs you with a beep and a little pop-up. You can also specify a command which should be run.

tea ready pop-up

For me kteatime is the only reason besides k3b to keep the KDE libraries installed. Even as a KDE application it just works fine under XFCE.

kteatime is available since Debian Sarge (perhaps even longer) and also part of every version of Ubuntu.

Posted in Debian, Ubuntu | 8 Comments »

« Previous Entries Next Entries »