Search

xmlstarlet: Command Line XML Toolkit

March 22nd, 2009 edited by Vicho

Article submitted by Vasily Faronov. Guess what? We still need you to submit good articles about software you like!

With the proliferation of XML-based formats, it is nice to have tools that manipulate XML documents in the traditional Unix-like fashion, as the good old grep(1), sed(1) and other tools do for plain text. xmlstarlet is one of such tools. In fact, it is an entire toolkit packed into one program: xmlstarlet can extract data from XML documents, alter them, validate them, and perform many other useful operations. xmlstarlet has been available in Debian since at least release 4.0 “etch”, and in Ubuntu since at least release 6.06 “Dapper Drake”.

Let’s look at a few features of xmlstarlet more closely.

Extracting Data from XML Documents

There is a flexible way of processing XML documents and extracting data from them — a language known as XSLT. Both Debian and Ubuntu provide utilities, such as xsltproc, to deal with XSLT. However, this language is not exactly terse, and it requires you to first compose a separate document defining the desired transformation, and then apply it to the original document. When all you want to do is extract a few values from a document, you’d like something more approachable.

xmlstarlet is your friend. It features a relatively simple command syntax for selecting data, based on an auxiliary language called XPath, which allows for addressing elements in XML documents in a style reminiscent of filesystem paths. Behind the scenes, xmlstarlet still generates XSLT code, and it helps to know the actual XSLT language, but simple queries can be done almost intuitively.

Suppose we’d like to get a list of the recent headlines from the Debian Package of the Day website. We can use xmlstarlet to extract titles from the site’s RSS feed, because RSS is an application of XML. In RSS, entry titles are contained in title elements, in turn contained in item elements, which are in channel elements under the root rss element. The feed itself can be easily fetched with wget(1). Our pipeline would then look like this:

$ wget -O - https://debaday.debian.net/feed/ 2>/dev/null | \
> xmlstarlet sel -t -m /rss/channel/item -v title -n
Fonty Python: manage your fonts
localepurge: Automagically remove unnecessary locale data
vnstat: a console-based network traffic monitor
rtpg-www: Please your dearest with rtorrent’s power
iftop - display bandwidth usage on an interface by host
atop: an ASCII full-screen performance monitor
dstat: versatile tool for generating system resource statistics
tellico: collection manager for books, videos, music, and a whole lot more
atool: handling archives without headaches
watch (from procps): execute a program at regular intervals, and show the output

The wget invocation is hopefully obvious (if it isn’t, just believe me that it downloads the feed and prints it to the standard output), so let’s dissect the xmlstarlet part.

  1. sel, which stands for “select”, is the subcommand to invoke within xmlstalrlet — since it’s a toolkit, it contains a number of such subcommands.
  2. The -t option designates the beginning of a template — roughly, a group of processing instructions.
  3. The -m option specifies a match, and /rss/channel/item is an XPath expression; together they translate to “for each item element found under a channel element under the rss element”.
  4. Then we specify what to do for that match: in our case, -v title prints out the value of the title element under the current item, and -n prints a newline separator.

The various options to xmlstarlet’s sel subcommand can be combined to produce fairly complex XSLT transformations. You can view the XSLT code generated by your command by adding the -C option.

Validating XML Documents

There are several ways of defining an XML document format, and the simplest of them is called document type definition, or DTD. A DTD defines which elements are allowed to appear in a document and what they can contain. DTDs for some popular formats, such as XHTML, are included in the Debian and Ubuntu archives. The val subcommand of xmlstarlet can validate documents against a DTD — that is, check if the documents comply with the formal requirements laid out in a DTD. In addition to DTD, xmlstarlet can also handle the more advanced XML Schema and RELAX NG languages.

As an example, let’s integrate xmlstarlet with gedit, the GNOME text editor, to enable easy validation of XHTML 1.0 Strict documents. We will need the w3c-dtd-xhtml package that contains the DTD files.

To validate against a DTD, xmlstarlet should be invoked with the val subcommand, the -d option (for “DTD”), and a path to the DTD file. As in the previous example, the document can be piped into xmlstarlet. We will integrate it into gedit by means of the latter’s “External Tools” plugin. Enable it by choosing “Edit” → “Preferences” → “Plugins” and marking “External Tools”. Then, in the “Tools” menu, select “External Tools” and click “New”. Name the tool as you wish, and optionally give it a description and a shortcut key. For “Command(s)”, enter this simple script:

#! /bin/sh
xmlstarlet val -d /usr/share/xml/xhtml/schema/dtd/1.0/xhtml1-strict.dtd -

xmlstarlet validating a remote XHTML document in gedit
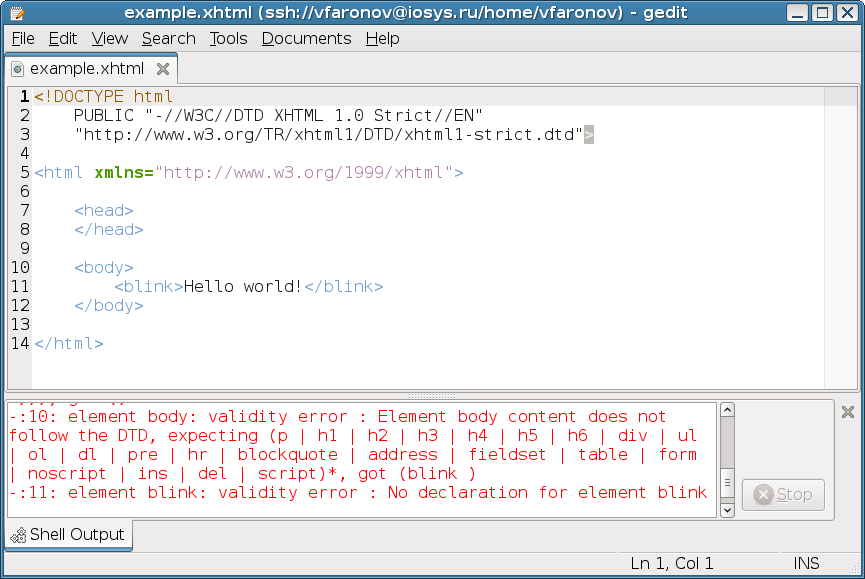
Choose “Current document” for input, “Display in the bottom pane” for “Output”, and set “Applicability” to “All documents”. And that’s it. You can now validate any document you open in gedit from the “Tools” menu — even if the document comes from a remote location by way of the GNOME virtual filesystem.

With some more effort, you can write a script to validate any document for which you have the DTD installed. (Hint: you may use xmlcatalog(1) from the libxml2-utils package to locate DTD files by their public identifiers.)

Other Uses

This article cannot cover many other features of this toolkit, such as editing XML documents (ed), listing their element structure (el), or pretty-printing (fo). You may want to check out the examples that come with the xmlstarlet package (/usr/share/doc/xmlstarlet/examples), and to the reference help available by invoking xmlstarlet ‹COMMAND› --help.

Related Tools

The Debian archive also contains the python-4suite-xml package, which among other things provides some command tools for XML processing similar to xmlstarlet. However, 4suite seems to be intended more as a Python package, and consequently its command tools appear to be less feature-complete than xmlstarlet.

For solving specific XML-related problems, such as converting XML to and from other formats, you may want to have a look at the more specialized packages available in Debian and Ubuntu. The Debian Reference has an overview of some of those.

Posted in Debian, Ubuntu | 2 Comments »

fwbuilder: Manage Firewalls Professionally

March 15th, 2009 edited by Vicho

Article submitted by Vadim Kurland. Guess what? We still need you to submit good articles about software you like!

Firewall Builder is available from the libfwbuilder and fwbuilder packages in both Debian and Ubuntu in Universe. Packages for the current development builds are available from the project download area on SourceForge.

Eveyone knows about netfilter/iptables, a powerful firewall framework and command line tool that is part of every Linux distribution. Unfortunately, managing a security policy with it remains a non-trivial task for several reasons. Partially this is because of the complex syntax of the command line interface and the vast amount of available options and parameters. Another reason is that the administrator has to understand the internal path of the packet inside the Linux kernel and its interaction with different parts of netfilter in order to build rules correctly. This is not a specific problem of iptables though, other popular Open Source firewall platforms, such as OpenBSD PF, ipfilter and ipfw present similar challenges.

What is needed is a tool that lets an administrator define the security policy on a higher level of abstraction and hide the internal structure of the target firewall platform. For example, such a tool should decide which iptables chain is right for each generated iptables rule automatically, without the administrator’s input. It should also pick the right iptables targets for both policy and NAT rules as well as properly use most popular iptables modules, all automatically. Such tool should also implement best practices in policy design and help administrator deploy and activate generated policy on the firewall.

Firewall Builder does just that.

Introduction

Firewall Builder is a GUI firewall configuration and management tool that supports iptables (netfilter), ipfilter, pf, ipfw, Cisco PIX (FWSM, ASA) and Cisco routers extended access lists. It presents all supported firewalls to the administrator in terms of unified abstract firewall that takes the best features from all of them and hides their specifics and inconveniences. Firewall Builder is more complex than many basic firewall configuration GUIs such as Firestarter, but on the other hand one can build very complex policies with Firewall Builder and fully utilize flexibility and power of iptables and other supported firewalls.

The general idea should be familiar to anyone who has ever worked with commercial firewall management systems. All configuration management operations can be performed from one central place: the Firewall Builder GUI. You create and manage collection of objects that describe network addresses, hosts and firewalls, as well as services, and then build firewall policy and NAT rules using these objects. Policy rules are defined in terms of “Source” and “Destination” addresses and “Service” and can have additional parameters such as interface association, direction, time interval and optional platform-dependent attributes. NAT rules are defined by addresses and services before and after translation.

Example of a policy rule

Rules are built with simple drag and drop operations and then firewall configuration can be generated with one click of a mouse. In the end, Firewall Builder produces a script or configuration file in the language of the target firewall. For iptables, it creates shell script that loads iptables rules, while for other platforms it creates a configuration file suitable for them. This makes it simple to deploy and activate the generated policy and also helps integrate Firewall Builder with existing automation scripts.

Fragment of the standard TCP objects library
The program comes with a collection of over 100 standard objects that can be used to describe popular TCP, UDP and ICMP services.

Firewall Builder implements many best practices in firewall policy design and firewall management procedures. Here are just a few examples:

  • It enforces a policy structure that denies all traffic by default and only permits what is necessary.
  • The administrator can easily define IP address of the management workstation and Firewall Builder will automatically add a rule to ensure that ssh access from it to the firewall is always permitted. This rule is designed to assure that ssh session over which the installer activates a new policy does not break or hang. This helps to avoid accidents when errors in the policy rules cut off remote access to the firewall in the middle of an activation, making it impossible to fix the error and causing prolonged network outage.
  • For Cisco PIX (ASA) and IOS access lists, where each access-list commands are immediately activated as they are entered, Firewall Builder can optionally create temporary access lists to ensure uninterrupted ssh access from the management workstation to the firewall for the duration of the policy reload session. This method provides the best protection against outages caused by loss of contact with the firewall because of errors in policy.
  • For iptables, Firewall Builder can generate a script using iptables-restore for atomic activation. If iptables-resore detects an error in the script and refuses to load the policy, script leaves the firewall in the state it was in before. For other firewall platforms it uses appropriate activation methods to achieve the same goal.
  • The built-in policy installer supports “test” install mode with automatic roll-back. This is another safety mechanism that helps minimize outages in case of errors in the policy. These measures are available for all supported systems, such as Linux/iptables, *BSD/pf, Cisco PIX and Cisco IOS.

Quick Tour

Main window

The main window of the program includes objects tree on the left (1), brief information about object selected in the tree (2), current firewall policy view (3) and a dialog panel where you can edit objects parameters (4).

As all Open Source projects, Firewall Builder depends on the user community who provide testing, bug reports and other forms of feedback. You can file bug reports and feature requests using the bug tracking system. The mailing list is a great place to ask for help and discuss the program with other users.

This was just a brief introduction to the Firewall Builder package. If you are interested in the program, you can find more information on the project web site at http://www.fwbuilder.org. The slideshows Introduction to Firewall Builder 3.0 for the impatient and Getting starter with Firewall Builder can help you get more familiar with the program.

Posted in Debian, Ubuntu | Comments Off

PIDA: the Python Integrated Development Application

March 8th, 2009 edited by Tincho

Article submitted by Javier Derderian. Guess what? We still need you to submit good articles about software you like!

PIDA screenshotPIDA is an IDE (integrated development environment) written in Python and the pygtk graphical toolkit. It is slightly different from other IDEs: rather than attempting to write a set of development tools of its own, PIDA reuses available tools. In this regards PIDA can be used as a framework for putting together your own customized IDE.

Although still a young application, PIDA already boasts a huge number of features because of the power of some of the tools it integrates. For example features such as code completion and syntax highlighting are well implemented in PIDA’s integrated editors far better than any editor built for a commercial IDE. PIDA currently features many code editing helpers: syntax highlighting, code completion, automatic indenting, block commenting, etc; project management, version control management, Python debugger and profiler, GTK+ GUI building and rapid application design.

Among the already integrated components you can find:

  • VIM and Emacs as embedded editors with full support of each one’s features:
    • Syntax Higlighting
    • Code completion
    • Plugins
  • Bazaar, Git, Subversion (and more) as version control systems.

It’s actually designed to program in any language, but it has some Python specific features like a Python shell. You can program you own plugins, and there’s a very nice API documentation to help you go trought the plugin development path.

Some already available plugins are:

Pastebin
Send code to a pastebin service
PdfTex preview
PdfTex preview compiles and displays pdf documents every time the buffer is saved.
Python
Show class/function from python file, and show compilation errors
Python Debugger
Python Debugger based on RPDB2 the WinPDB Back End
Unit Tester
Perform unit tests
Docbook browser
Browse local docbook
Todo manager
Manage a personnal todo list per project
RFC Viewer
Download RFC index, search and view RFC pages inside PIDA
Bazaar
This plugin, developed outside of the project, integrates lots of Bazaar function that are not included in the base version control integration

PIDA is a great way of keep using Vim and have a nice GUI around to help you work faster with the file browser, the project manager and the internal shells. You can get more info on using and developing PIDA in the handbook

There are official packages available in both Debian and Ubuntu for a long time now.

And remember: PIDA LOVES YOU!

Posted in Debian, Ubuntu | 10 Comments »

bash-completion: the greatest things since bash completion

March 1st, 2009 edited by Tincho

Article submitted by Andre Masella. Guess what? We still need you to submit good articles about software you like!

Pressing the tab key in bash to auto-complete a file name is one of the most time saving tricks especially when dealing with very long file names. Unfortunately, file name completion is not always the right behavior. Take Subversion for example. The first argument to svn is the sub-command to use. The file name is also restricted: svn add only takes files not under revision control and svn rm only takes files that are under revision control.

This is where the bash-completion package steps in. After installing it with a quick apt-get install bash-completion, a few lines need to be uncommented in sudo vim /etc/bash.bashrc and the shell restarted. After that, try this:

$ svn <TAB><TAB>
add         cl          diff        list        move        propdel     rename      unlock
annotate    cleanup     export      lock        mv          propedit    resolve     update
blame       co          -h          log         pdel        propget     resolved    --version
cat         commit      help        ls          pedit       proplist    revert
changelist  copy        --help      merge       pget        propset     rm
checkout    cp          import      mergeinfo   plist       pset        status
ci          delete      info        mkdir       praise      remove      switch

Ta-da! Smarter completion for subversion.

bash-completion will alter the behavior of most commands to limit the display to relevant files. For example, mpg321 will only display MP3 files in the list. Programs like rmmod, iwconfig, ifup, and lvm will display relevant choices that are not files at all. Even bash’s fg and bg will now tab-complete with job identifiers.Completion for man is useful as it will auto-complete only man pages that exist and allows you to incrementally narrow your search by providing the beginning of the man page name, just like with regular files.

Occasionally, it doesn’t behave as expected. Particularly, sometimes a file with the wrong extension will be filtered out by bash-completion. For example, if you save an image for certain Internet forums, the file will sometime lack an extension. bash-completion will then filter out that file because it does not have the right extension. This can also happen if the capitalization is unusual. For example, bash-completion will suggest files that end in .mp3 or .MP3 for mpg321, but not .Mp3. In that case, either rename the file or insert # at the beginning of the line. The # makes bash think this line is a comment and bash-completion returns to regular file name completion. Once finished, remove the # and run the command.

bash-completion is available in Debian and Ubuntu. If it isn’t available, it is very easy to install from source.

Posted in Debian, Ubuntu | 18 Comments »

Fonty Python: manage your fonts

February 22nd, 2009 edited by Tincho

Article submitted by Donn Ingle. We’ve run out of articles! If you like Debian Package of the Day please submit good articles about software you like!

FP logoFonty Python is available from the fontypython package in both Debian and Ubuntu in Universe. Fonty is a wxPython app so will work in any desktop environment. It also has a command-line interface which avoids the gui.

What the font?

As a graphic designer, one is called-upon to create artwork for many things. Fonts change from one client to another, from one job to another. If busy enough, then one can soon amass a vast pile of font files. Some are downloaded from the net as freeware, others are purchased, others are supplied by the clients for their work.

These font-files are stored somewhere, independently of the system fonts managed by the Debian package manager, possibly sorted in whatever fashion you prefer. It’s crazy to have these fonts all installed at the same time. Besides whatever that may do to your computer’s speed, it has one gigantic drawback: it clutters up font-selection boxes. Have you ever tried to find a font in a list of 500 fonts? Bleh.

What you need is a way to herd fonts and that’s what Fonty does.

Bring out yer fonts!

FP screenshot
Fonty will let you gather your fonts and structure them into “collections” —or what I call “Pogs”— a place to keep tyPOGraphy (well, why not?)

Think of Pogs as “groups”, “bags”, “cases”, “boxes” —that kind of thing. It’s an oddball word invented to describe a bunch of font files.

Ye olde basic idea

You visually gather fonts into Pogs. You then install a Pog and all the fonts within it are active on the system. You finish your work and then uninstall the Pog.

Your fonts never move from where they live (so don’t worry). Neither are copies of your fonts made; only links to the original files are used to install the fonts into your home .fonts subdirectory.

For example, you might have a Pog called logoZoo into which you place all the TTFs you need to design a logo for a Zoo. After that, when you need to work with them, you simply install the logoZoo Pog and start your design app. All those fonts will now appear in Inkscape or The Gimp, and other apps. Do your work as normal, and forget about fonts.

When you are done designing, you uninstall logoZoo and all those fonts go away. The links to the original files are removed from your home .fonts
directory, effectively uninstalling each font.

Fonty is also great for just looking at fonts wherever they are on your computer, without having to install them first. Fonty also has a command-line, allowing very quick use. You can install or remove pogs without having to start the entire gui, which is neat.

Quick tour

The layout of Fonty is supposed to be as simple as possible. I stayed away from context-menus and drag and drop because I find them hard to use. The flow is left-to-right with the sources of fonts on the left and their targets on the right.

  • FP layoutPoint 1: You choose a Source Folder (or Source Pog) on the left.
  • Point 2 & 3: You then see the fonts in the middle. You can page or Point or search around (Points 5,7). You click the fonts you want to use.
  • Point 4: On the right, you choose a Pog, or make a new one.
  • Point 6: Once you have a Target Pog selected, you can place fonts that you ticked into it.
  • Point 8: On the bottom-right you then Install or Uninstall Pogs as you need them.
  • There is a settings box (ctrl+s) where you can change the sample text and sizes.
  • Check the help too — it’s full of tips and quite short.
FP screenshot

Bad fonts

Some fonts are simply bad to the bone. Fonty relies on freetype and PIL to open and draw the glyphs, and when this fails so does Fonty. I have put a lot of effort into catching this, but it does not always work. When a font crashes Fonty, you should get a popup box telling you which one did the deed. You really ought to remove that font! Some fonts cannot be displayed, and Fonty will show that by using coloured bars in the display area.

There is also a menu item (File > Check Fonts) that you can point at a given directory and scan it for fonts that will crash Fonty. Use this when you want to cull all the fonts that are bad.

Font Flavours

Originally, Fonty could only show TTF files. Since then I have expanded it to include OTF, Type1 and TTC files. As far as I can tell, being only seminiscient, this all works.

i18n

Fonty speaks your language; or it will if you translate it. There are a few translations available and you can join the project to contribute others.

Fonty needs help

With Python heading for version 3 and all kinds of other changes, Fonty is falling behind. She still works quite well, but I cannot spend the time I want to on her. If there’s anyone out there who wants to stick a fork in her and run —please do.

I hope to find some time this year to have another go; fix some bugs and include a few translations I have been sent, but I can’t be relied upon.

You can check out the author’s home page for Fonty and the project home page.

Posted in Debian, Ubuntu | 2 Comments »

« Previous Entries Next Entries »