Search

mytop: a top clone for MySQL

December 26th, 2007 edited by Tincho

Article submitted by Claudio Criscione We are running out of articles! Please help DPOTD and submit good articles about software you like!

Ever wondered “what the hell is that mysql server doing”? Search no longer, My top is the answer.

Mytop is a clone of top, a utility every sysadmin knows about, but instead of monitoring the system, it follows MySQL threads. In a nutshell, it’s a nifty command line tool that will connect to a MySql server and periodically run the SHOW PROCESSLIST and SHOW STATUS commands. It will then provide nice summaries of the results, and let the user apply various filters.

After the installation you can run mytop providing some parameters, for example: mytop -u root -p rootpass -d database, where database is the database you want to monitor, or you may create a .mytop file containing the configuration directives so you don’t have to type everything every time.

MyTop

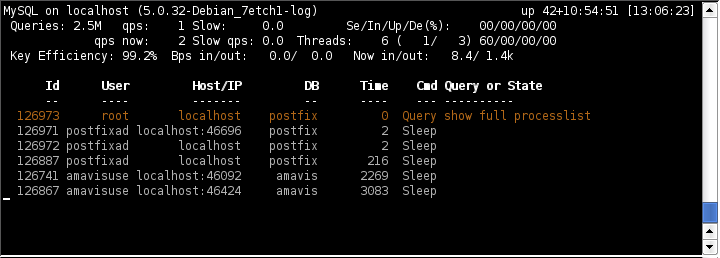
As you can see in the screen shot, the main screen can be divided in two parts. The upper part, the header, which you can remove pressing H, contains statistical informations on the server. On the the first line, you have the host name, the version and the uptime of the MySQL server (in days+hour:minutes:seconds format).The second line will show you the total number of queries the server has processed and the average number of query per second. The slow label marks the number of slow queries —remember you can log slow queries configuring your mysql server.

The third line contains now information: queries per second, slow queries and —if your MySQL version is recent— threads information. On the fourth line you can see the efficiency of the key buffer —that is, how often mysql will find keys in the buffer instead of reading from the disk— the average number of bytes that MySQL has sent and received and how many bytes it is sending and receiving now.

The second part of the screen will list the active threads. As you can see in the screen shot, the thread mytop is using will be listed too. The thread list will show you the user name, database and host name for each thread, which query each thread is running or its state. As the documentation states, it might be a good idea to run mytop in an xterm that is wider than the normal 80 columns if possible, so you can see the whole line.

While inside mytop, you can use h and d to filter for a particular host or database in the thread list, or u to filter on user name. The F key will reset all the filters.

A very useful command is the k command, able to kill a given thread, and you can use f to get more information about a running thread.

If you want to embed mytop in your script or webapp, you can use the -b switch to have mytop run in batch mode. In batch mode, mytop runs only once, does not clear the screen, and places no limit on the number of lines it will print; as the documentation says.

Mytop has been available both Debian and Ubuntu since a long time ago.

Posted in Debian, Ubuntu | 4 Comments »

cpipe: Determine the throughput of a pipe

December 23rd, 2007 edited by paulgear

Article submitted by Todd Troxell. Please help DPOTD by submitting good articles about software you like!

A package I find useful is cpipe. It is simple tool you can use to determine the throughput of a pipe. Potential uses of cpipe might include determining the speed of:

  • backups that use tar and dd
  • your system’s pseudo-random number generator (see below)
  • an OpenSSH tunnel or OpenVPN between two systems on the Internet

For example, to determine the speed at which you can read from /dev/urandom and write to /dev/null, run:

$ cpipe -vt < /dev/urandom > /dev/null

This will produce output like the following:

thru:  56.045ms at    2.2MB/s (   1.3MB/s avg)    1.1MB
thru:  74.936ms at    1.7MB/s (   1.3MB/s avg)    1.2MB
thru:  21.748ms at    5.7MB/s (   1.4MB/s avg)    1.4MB
thru:  90.131ms at    1.4MB/s (   1.4MB/s avg)    1.5MB

You can also use it to measure read times, write times and to limit throughput:

$ cat /dev/zero | cpipe -s 100 -vt > /dev/null
thru: 1256.079ms at  101.9kB/s ( 101.9kB/s avg)  128.0kB
thru: 1259.942ms at  101.6kB/s ( 101.7kB/s avg)  256.0kB
thru: 1260.469ms at  101.5kB/s ( 101.7kB/s avg)  384.0kB

Cpipe’s upstream homepage is http://cpipe.berlios.de/. It is written by Harald Kirsch. It has been available in Debian since (at least) sarge, and Ubuntu since (at least) dapper.

Posted in Debian, Ubuntu | 4 Comments »

Liferea: an RSS reader for GNOME

December 19th, 2007 edited by paulgear

Article submitted by Paul Gear. Please help DPOTD by submitting good articles about software you like!

I recently discovered Liferea, an RSS reader/aggregator that uses Mozilla’s xulrunner as its web browsing engine. Its interface resembles that of a mail client such as Mozilla Thunderbird (a.k.a. icedove), and it works in much the same way, marking items as read when you click on them. Here’s a screen shot of Liferea in action:

screenshot-liferea.png

Useful features include:

  • Items in feeds may be flagged for later reference, and viewed in a separate “Flagged” folder
  • Custom folder hierarchies for organising feeds
  • “Heads-up display” on-screen notifications
  • Selectable web browser (either internal, or any of the GNOME options)

Installation is typically straightforward using the standard package management tools on Debian or Ubuntu. A GNOME menu item is automatically created, and I was immediately productive after finding the basic menu items. Each feed has a number of options available, and Liferea will intelligently choose an appropriate refresh interval for each feed, or use your default if you prefer that instead.

One feature that would be useful to add to Liferea (this review is based on version 1.0.27 from Debian etch) is emailing of links, but this is easily worked around by opening in an external browser, and using the email link option from there.

Despite discovering it largely by accident (I saw it in the user agent portion of my blog’s Apache log), Liferea has become a mainstay desktop application for me. If you don’t find Liferea appropriate for your needs, you might want to check Wikipedia’s list of feed aggregators for one more appropriate to your needs.

Liferea has been in Debian since at least sarge and Ubuntu since at least dapper (it was in the universe repository prior to feisty).

Posted in Debian, Ubuntu | 10 Comments »

HTTrack: Website crawler / copier

December 16th, 2007 edited by Alexey Beshenov

Article submitted by Zhao Difei. We are running out of articles! Please help DPOTD and submit good articles about software you like!

HTTrack is a powerful tool that allows you to download / mirror a website to a local location.

Basically, HTTrack follows the links of the original website, recursively downloads them to the local directory while re-arranging the hyper-links structure so you can just simply open a downloaded HTML file and browse at the local machine. In contrast, the recursive mirror function of Wget will not rearrange the hyper-links on the web pages you downloaded, so they might still be pointing to remote locations.

HTTrack is a powerful tool but the syntax is very simple, let’s have a look at the basic usage:

$ httrack –help

HTTrack version 3.41-3 (compiled Jul 3 2007)
usage: httrack <URLs> [-option] [+<URL_FILTER\>] [-<URL_FILTER>] [+<mime:MIME_FILTER>] [-<mime:MIME_FILTER>]

A simple example that copies the debian.org website to the local “httrack” directory:

$ mkdir httrack
$ cd httrack/
$ httrack debian.org
Mirror launched on Sun, 30 Sep 2007 18:05:40 by HTTrack Website Copier/3.41-3+libhtsjava.so.2 [XR&CO'2007]
mirroring debian.org with the wizard help..
* debian.org/intro/about.ro.html (17854 bytes) - OK

HTTrack can also apply download filters, you may have noticed the “*_FILTER” things from the httrack usage line above, the plus sign + means to download a specific patter, and the minus sign - means to avoid download. The following examples (mirroring slashdot) show a simple usage of filters, the first one will not download items from the apple.slashdot.org site, and the second one will not download items which have a MIME image/jpeg type, please notice that you can still view the things you did not download if you have the Internet connection available, because HTTrack will arrange the hyperlinks for you:

$ httrack slashdot.org -apple.slashdot.org*
$ httrack slashdot.org -mime:image/jpeg

To download two sites that share lots of common links, you can do:

$ httrack www.microsoft.com www.evil.com

There are still many options and more advanced usages left, interested readers may always read the manual. HTTrack is available in Debian from oldstable Sarge to unstable Sid and for Ubuntu from Dapper to Gutsy.

Posted in Debian, Ubuntu | 4 Comments »

gddrescue: a tool for recovering data from damaged media

December 12th, 2007 edited by Tincho

Entry submitted by John Carlyle-Clarke. DPOTD needs your help, please contribute!

I wanted to recover data from a failing hard drive, and asked on IRC if any good tools existed for Ubuntu. Someone pointed me towards GNU ddrescue (named gddrescue in Debian and Ubuntu), which is designed for rescuing data from any file or block device.

Don’t confuse this with dd_rescue (package name ddrescue). GNU rescue is a better tool.

The GNU site describes GNU ddrescue as a data recovery tool, and lists these features:

  • It copies data from one file or block device (hard disc, CD-ROM, etc) to another, trying hard to rescue data in case of read errors.
  • It does not truncate the output file if not asked to, so every time you run it on the same output file, it tries to fill in the gaps.
  • It is designed to be fully automatic.
  • If you use the log file feature of GNU ddrescue, the data is rescued very efficiently (only the needed blocks are read). Also you can interrupt the rescue at any time and resume it later at the same point.
  • The log file is periodically saved to disc. So in case of a crash you can resume the rescue with little recopying.
  • If you have two or more damaged copies of a file, CD-ROM, etc, and run GNU ddrescue on all of them, one at a time, with the same output file, you will probably obtain a complete and error-free file. The probability of having damaged areas at the same places on different input files is very low. Using the log file, only the needed blocks are read from the second and successive copies.
  • The same log file can be used for multiple commands that copy different areas of the file, and for multiple recovery attempts over different subsets.

The algorithm of GNU ddrescue is as follows:

  1. Optionally read a log file describing the status of a multi-part or previously interrupted rescue.
  2. Read the non-damaged parts of the input file, skipping the damaged areas, until the requested size is reached, or until interrupted by the user.
  3. Try to read the damaged areas, splitting them into smaller pieces and reading the non-damaged pieces, until the hardware block size is reached, or until interrupted by the user.
  4. Try to read the damaged hardware blocks until the specified number of retries is reached, or until interrupted by the user.
  5. Optionally write a log file for later use.

To use it, you need to install gddrescue, but it is invoked as ddrescue. This is confusing, but it’s because dd_rescue had already taken the name.

The syntax is simple and the man and info documents are pretty good. Here is an example session with a data CD (no errors found).

$ ddrescue -v /dev/cdrom Recovered.iso ddrescue.log

About to copy 101763 kBytes from /dev/cdrom to Recovered.iso
    Starting positions: infile = 0 B,  outfile = 0 B
    Copy block size: 128 hard blocks
Hard block size: 512 bytes
Max_retries: 0    Split: yes    Truncate: no

Press Ctrl-C to interrupt
Initial status (read from logfile)
rescued:         0 B,  errsize:       0 B,  errors:       0
Current status
rescued:   101763 kB,  errsize:       0 B,  current rate:    3801 kB/s
   ipos:   101711 kB,   errors:       0,    average rate:    2702 kB/s
   opos:   101711 kB

Useful links:-

Related software:-

gddrescue is available in Debian since Etch, and in Ubuntu since Edgy. It was started by Antonio Diaz Diaz in 2004.

Posted in Debian, Ubuntu | 6 Comments »

« Previous Entries